By Julien Soukhavong, Security Consultant, November 16, 2016.
Feedback from correlated events can be extremely useful for later analytics. What was the average daily number of devices over three months? We could do a complete search over the total time-period, but if we want to see this regularly, we would have to rerun a large query.
Instead we can use the output of one search as the input to another search. For instance: We count the number of devices every day and output that number as a log-file. Now we only have to compare a small data-set (90 days or the average of 90 integers). This is a substantially smaller task.
In LogPoint, we can do this by creating alert-rules. These alert-rules will run the function to compute the partial result (aggregation). The output of the alert-rule will be pushed back into LogPoint using syslog notifications.
Below, we have taken the built-in correlation rule for detecting traffic from known bad addresses and aggregating these results over a very long time-interval, using alert-rule feedback to syslog.
Typical use cases could be:
- How to gather relevant information from our security alerts?
- Which source addresses have generated my security alerts?
- Is a source address is involved in multiple or different security alerts?
The following procedure will show you step by step how to create a list of relevant data from generated SIEM alerts.
1. Create or enable an alert
In our example we will use the SIEM alert:
« LP_Default Accepted Traffic From Bad IP »
Setup Syslog alert notification
In the example, we will generate a syslog event to the LogPoint server itself:
Server/Port: 127.0.0.1 port:514
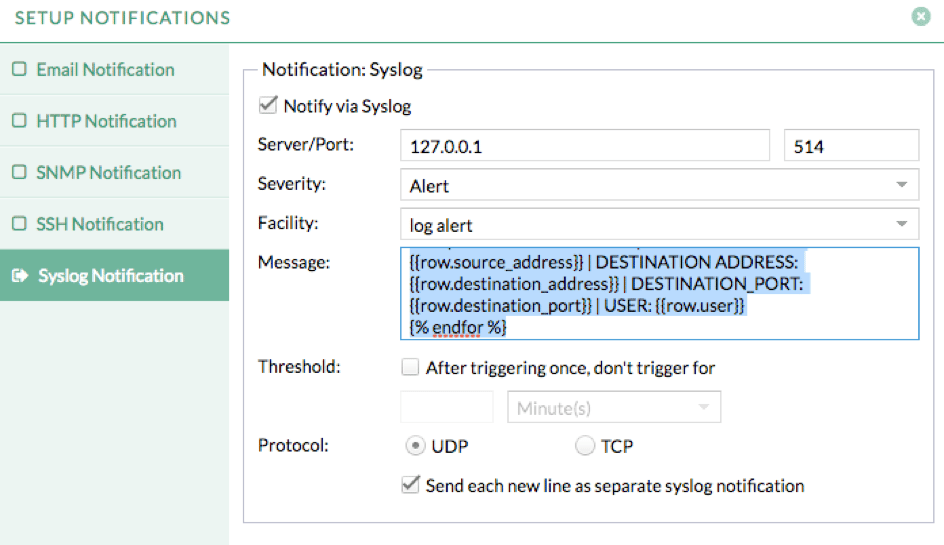
In the Message section, we will use a Jinja code to extract the relevant fields we would like to show in our notification.
{% for row in rows %}
Accepted Traffic From Bad IP | SOURCE ADDRESS: {{row.source_address}} | DESTINATION ADDRESS: {{row.destination_address}} | DESTINATION_PORT: {{row.destination_port}} | USER: {{row.user}}
{% endfor %}
2. Create a normalization package
A new notification event will be received each time the SIEM alerts trigger, so now, we need to normalize this event. In order to achieve this, we can replace the Jinja code syntax by our definers used for normalization:
<alert_name:’Accepted Traffic From Bad IP’> | SOURCE ADDRESS:| DESTINATION ADDRESS: | DESTINATION_PORT: | USER:
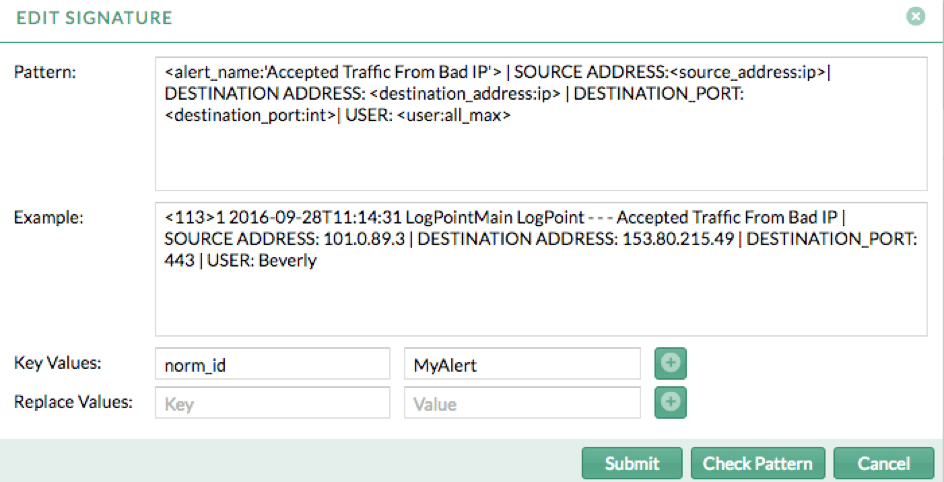
3. Create a normalization policy: MyAlert
Once the normalization package is created, we have to apply it in a normalization policy.
4. Create a New Repo where the notifications will be stored.
In the example, we will call it ‘Alerts’ and retention period will be set according to the duration we would like to keep the data available in the system.
5. Apply the normalization policy to localhost device / Syslog Collector and select ‘Alerts’ as Repo.
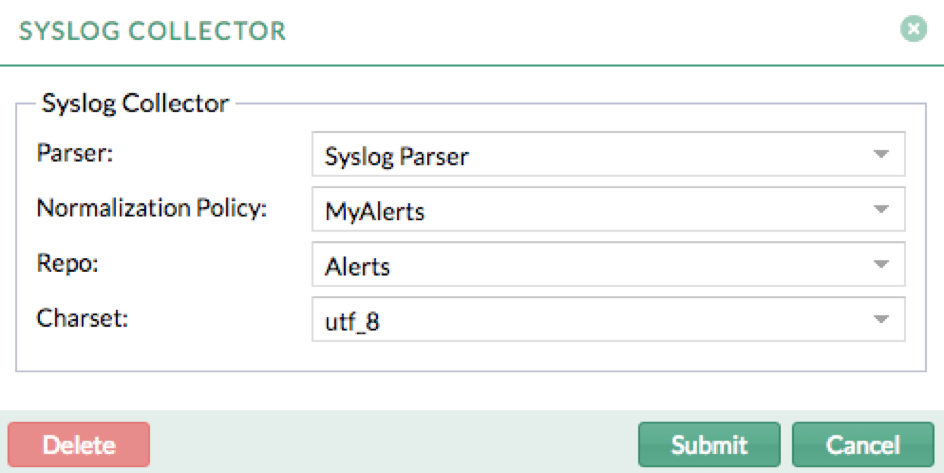
6. Now, for each new alert, your data will be normalized and stored in ‘Alerts’ Repo. From this Repo, you can perform:
- Analysis:
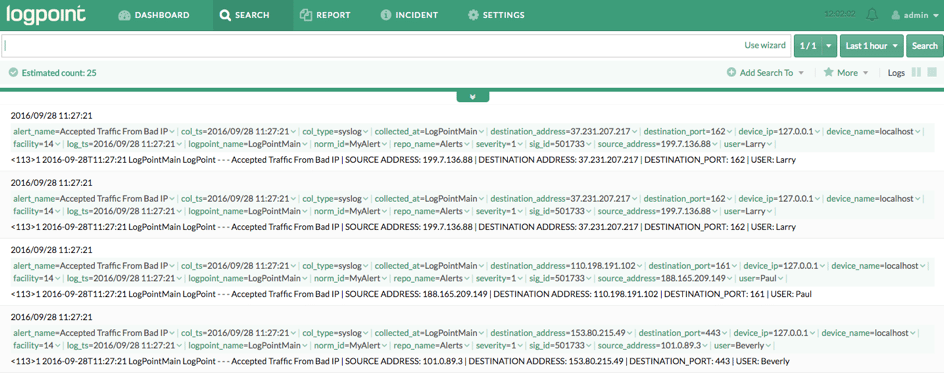
- Statistics:
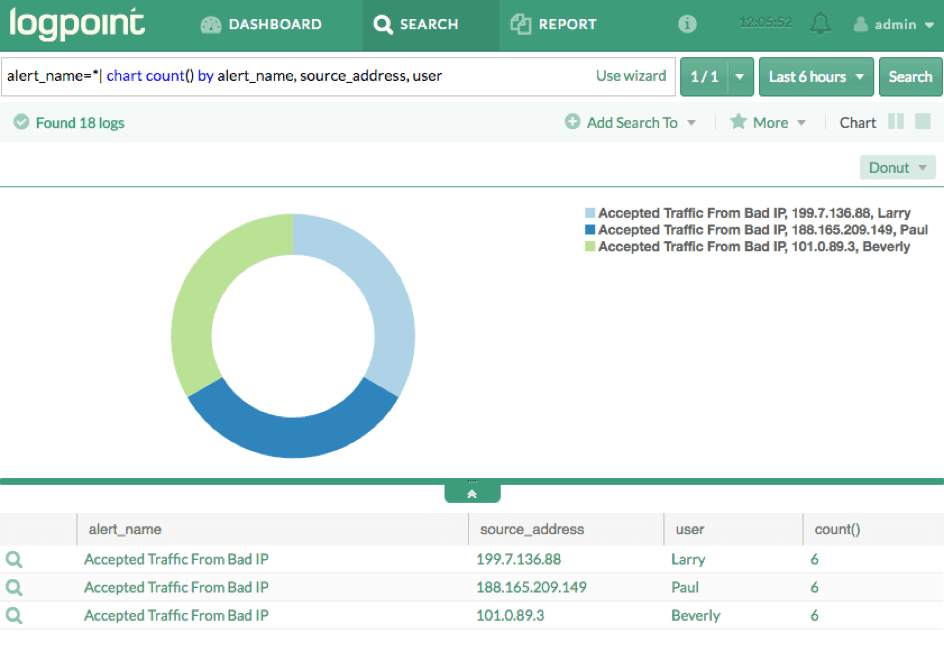
- Extract your list in csv:
| alert_name,source_address,count() |
| Accepted Traffic From Bad IP,101.0.89.3,6 |
| Accepted Traffic From Bad IP,199.7.136.88,6 |
| Accepted Traffic From Bad IP,188.165.209.149,6 |
This tutorial shows the power and configurability of LogPoint. By using existing functions, we can thoroughly extend the applications, scale and functionality of LogPoint.
How are you using “alert feedback through syslog” to get long-term insights into your enterprise?
If you want to know more about how LogPoint works, book a personal demo.


![[🇫🇷 WEBINAIRE A LA DEMANDE] – Logpoint pour les centres hospitaliers](https://www.logpoint.com/wp-content/uploads/2025/05/logpoint-santexpo-2025-500x383.webp)

![[🇫🇷 WEBINAIRE] – Je découvre Logpoint après Forum InCyber 2025](https://www.logpoint.com/wp-content/uploads/2025/03/webinaire-forum-incyber-2025-500x383.jpg)

